Data Access Options
DataHub provides access to your utility data through two ingestion options: zipped CSV files delivered to your SFTP server or access to a Snowflake Direct Share to query the data directly in Snowflake.
SFTP Delivery
In the SFTP option, you must setup your own SFTP server. You receive all three tables with all historical records upon initial SFTP setup. You also receive incremental files with new and updated statements every day moving forward. For SFTP delivery files, null values are represented as ,"\n", for VARCHAR-like data types and as ,"", for empty string values. Null values are represented as ,\\n, for NUMBER-like data types.
SFTP Setup
In order to set up your SFTP connection with Arcadia, you need to share the information below with your Arcadia contact. Arcadia will provide you our public key (2048-bit RSA). Please work with your IT or infrastructure department to configure and provide the details below. Please work with your Arcadia representative for handling any issues around initial setup.
- SFTP server hostname/IP
- e.g.
192.158.1.38or[sftp.example.com](http://sftp.example.com/)
- e.g.
- The username of the user you have set up for Arcadia to access your SFTP server.
- e.g.
arcadia - Note that you will need to associate Arcadia’s OpenSSH format public key (2048-bit RSA) with this user, so Arcadia may authenticate to your server. Most SFTP servers have an
authorized_keysfile that you should add this key to. This key can be found under the “Arcadia public key value” field in the SFTP setup modal on your Arc dashboard.
- e.g.
- Full path in the above user’s directory that you would like your Arcadia data to be stored.
- e.g.
/or/datahub/reports - You should create this folder and provide the created user write access to it before submitting this information to Arcadia.
- e.g.
Snowflake Data Share
For additional information on Snowflake Data Shares, review Snowflake’s overview guide. The Snowflake Data Share option supports all Snowflake-supported cloud providers and regions. After receiving access to the private Snowflake Data Share, you can query in SQL or Python against the full dataset in all three tables. The Snowflake Data Share table names are meters_by_statement_current, usages_current, and charges_current.
Snowflake Data Share Setup
To access DataHub’s Snowflake private Data Share, ensure your Snowflake account is hosted on a supported Snowflake cloud provider and region. Once confirmed, please provide these details to your Arcadia contact to setup the Data Share.
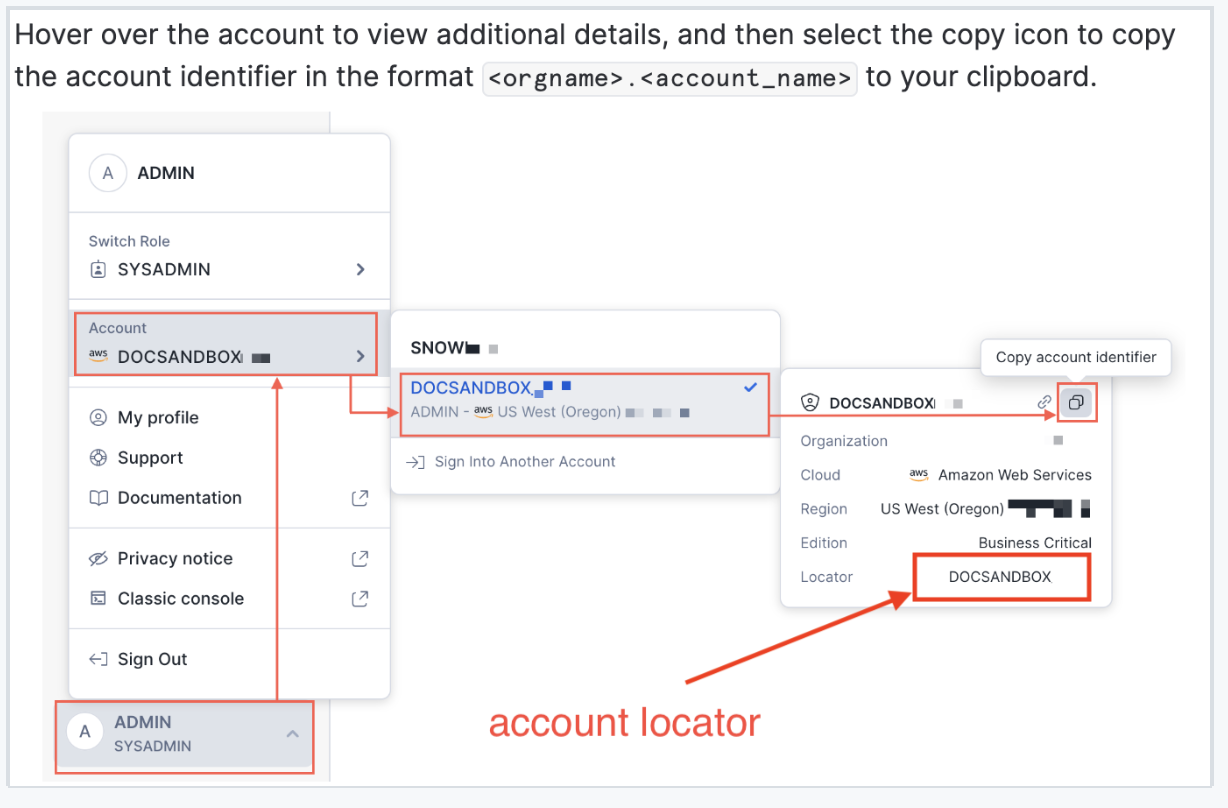
In your Snowflake environment, run the command below and provide your current organization name, account name, account locator, and region to your Arcadia contact.

select current_organization_name(), current_account_name(), current_account(), current_region();Once Arcadia sets up your Snowflake Account for Data Share, Arcadia database is available in the ‘Ready to Get’ section. In Snowflake’s Snowsight UI, you will:
- Sign in to Snowsight
- Select Data » Private Sharing
- Select the Shared with You tab
- In the Ready to Get section, select the share that you want to create a database for
- Set a database name and the roles that are permitted to access the database
- Select Get Data
Once the Data Share is available, you can query all the data in one of the four tables with:
SELECT * FROM datahub.shares.<table_name>;For additional information on Snowflake Data Shares, review Snowflake’s overview guide.
Updated 4 months ago
